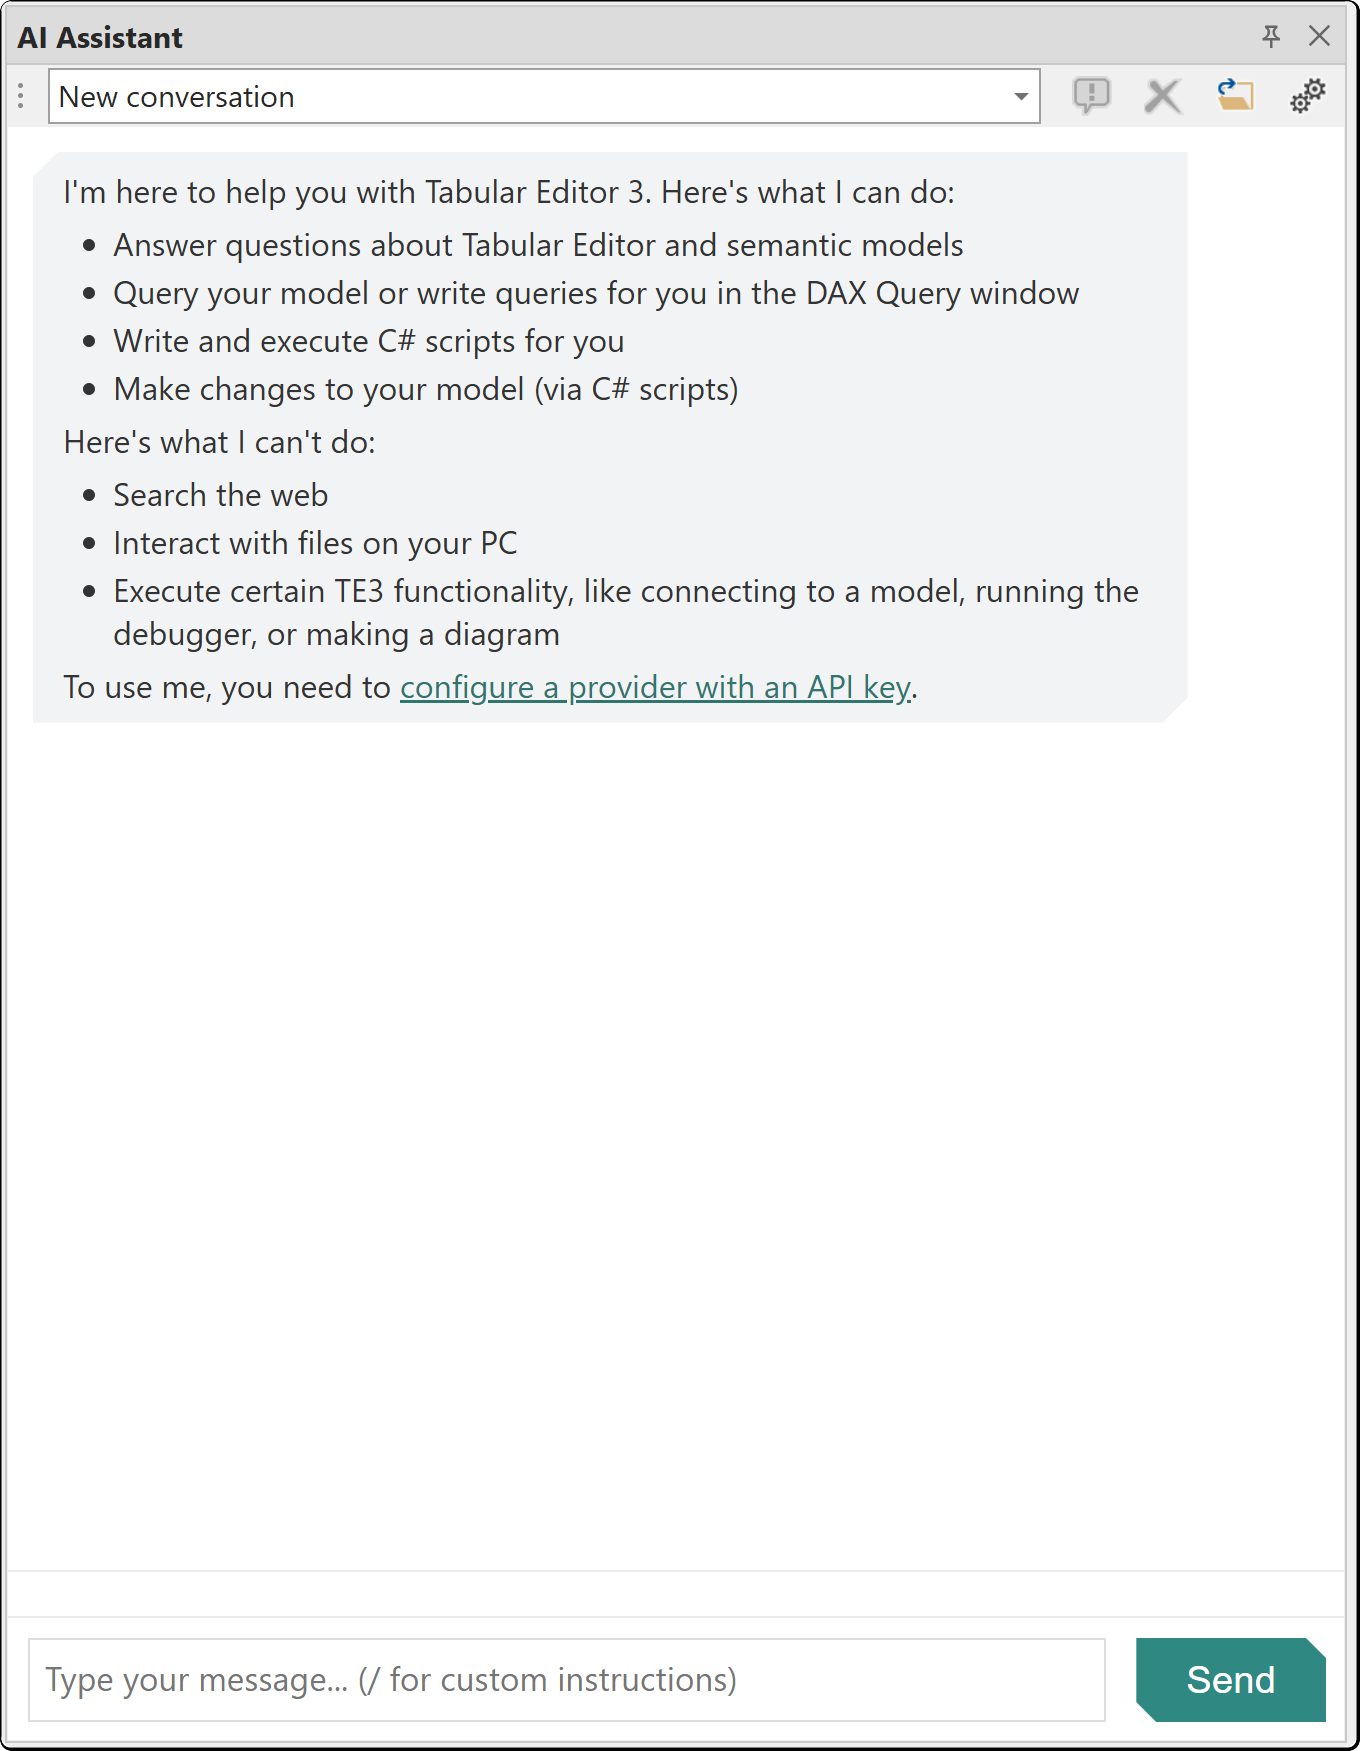
AI Assistant
The AI Assistant is a chat-based interface for AI-assisted semantic model development designed to help you create semantic models faster. With an enterprise-ready design, full control of what is sent to the AI, and built-in consent management, you can use the AI Assistant with confidence. The AI Assistant has undergone independent security penetration testing. For details, visit the Tabular Editor Trust Center. It can explore your model metadata, write and execute DAX queries, generate C# scripts, run Best Practice Analyzer checks, query VertiPaq Analyzer statistics and search the Tabular Editor knowledge base.
The AI Assistant uses a bring-your-own-key model. You provide an API key from one of the supported providers and the assistant runs directly against that provider's API.
Note
The AI Assistant is in public preview starting with Tabular Editor 3.26.0. We welcome feedback on the experience as we continue to refine it.
Getting Started
- Open Tools > Preferences > AI Assistant
- Select your AI provider — on a fresh install this defaults to None (AI disabled) — then enter your API key
- Open the AI Assistant panel from View > AI Assistant
- Type a message and press Enter to start a conversation
Tip
Use our interactive demo of the AI Assistant to see how to set up and use it.
Note
API keys are stored encrypted on your local machine.
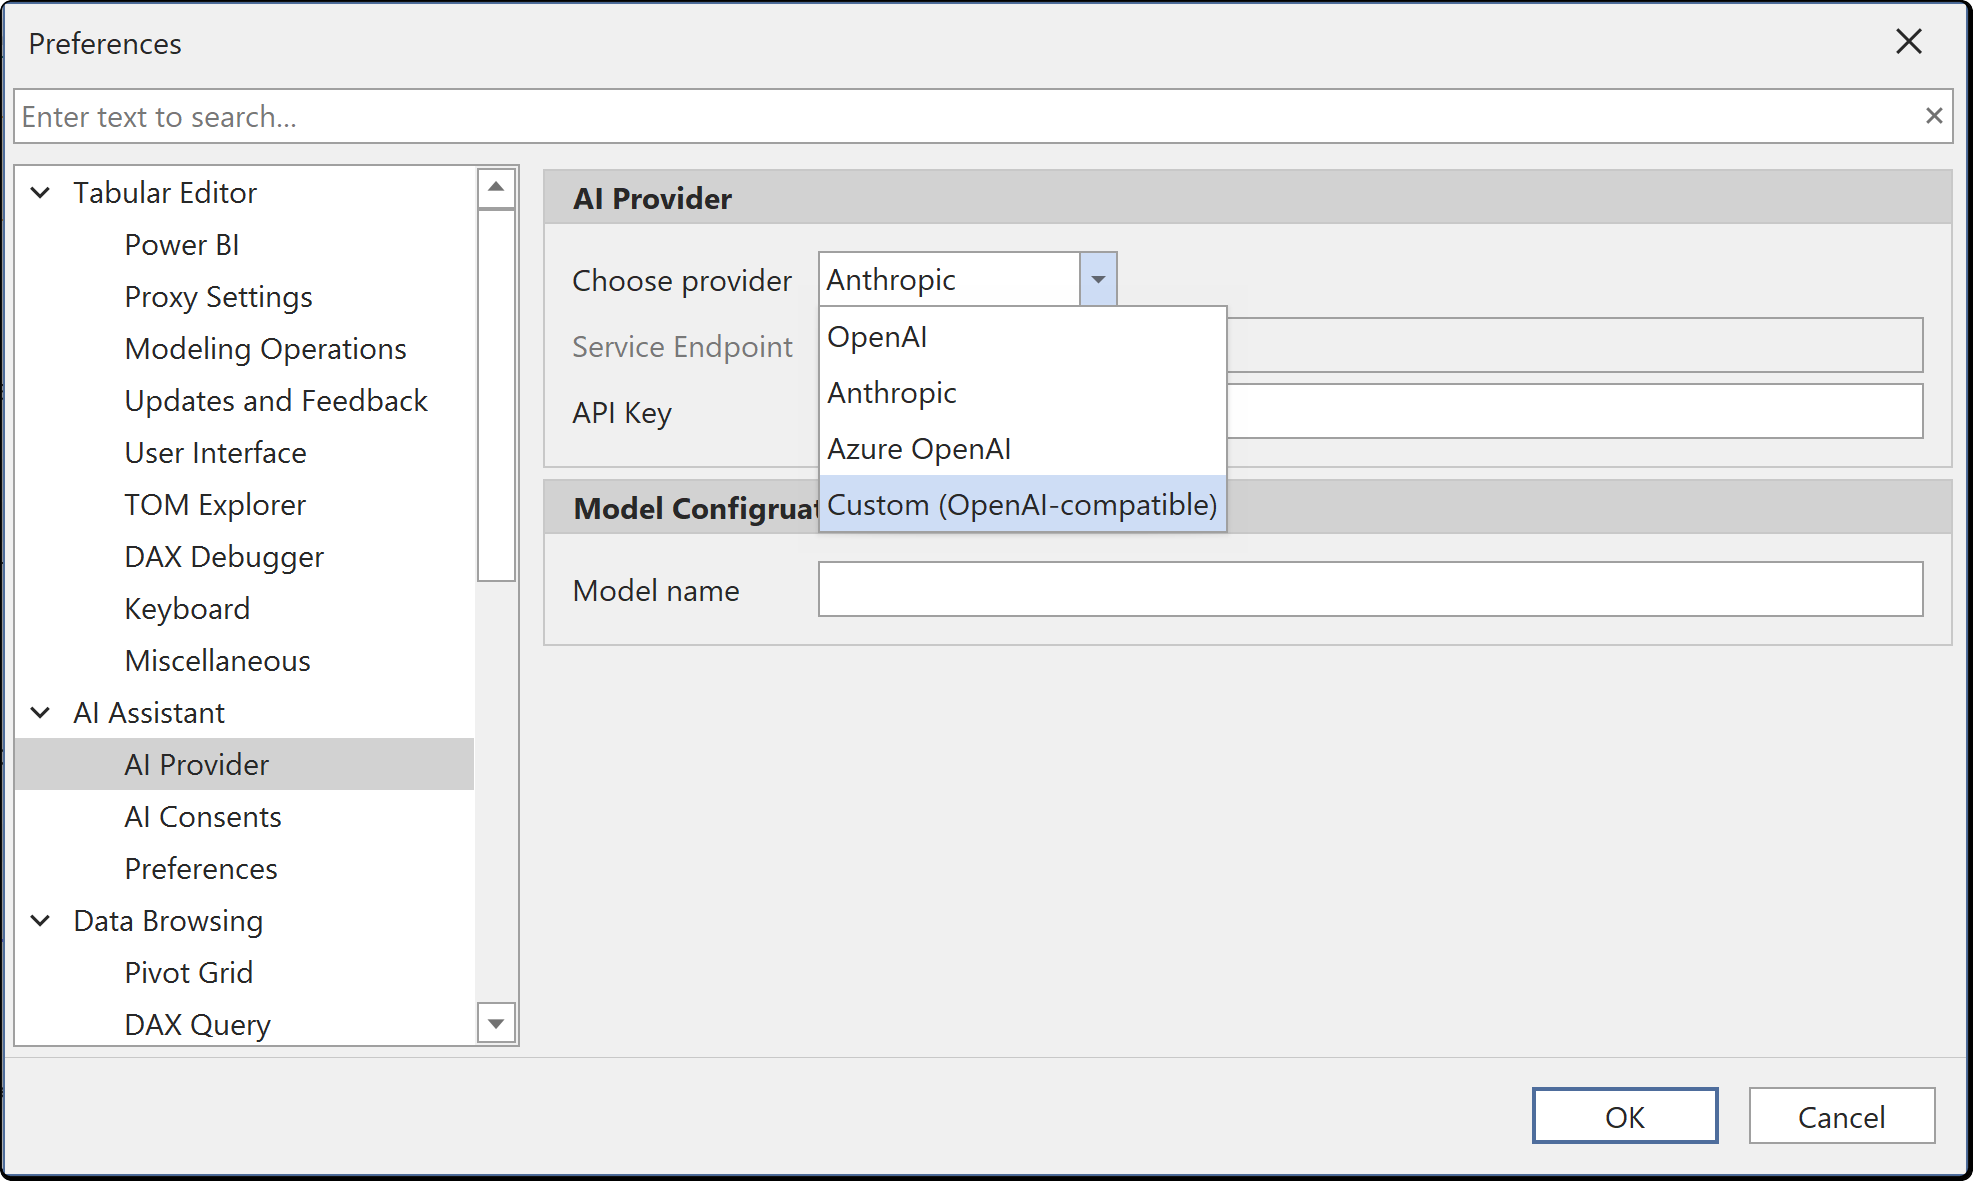
Supported Providers
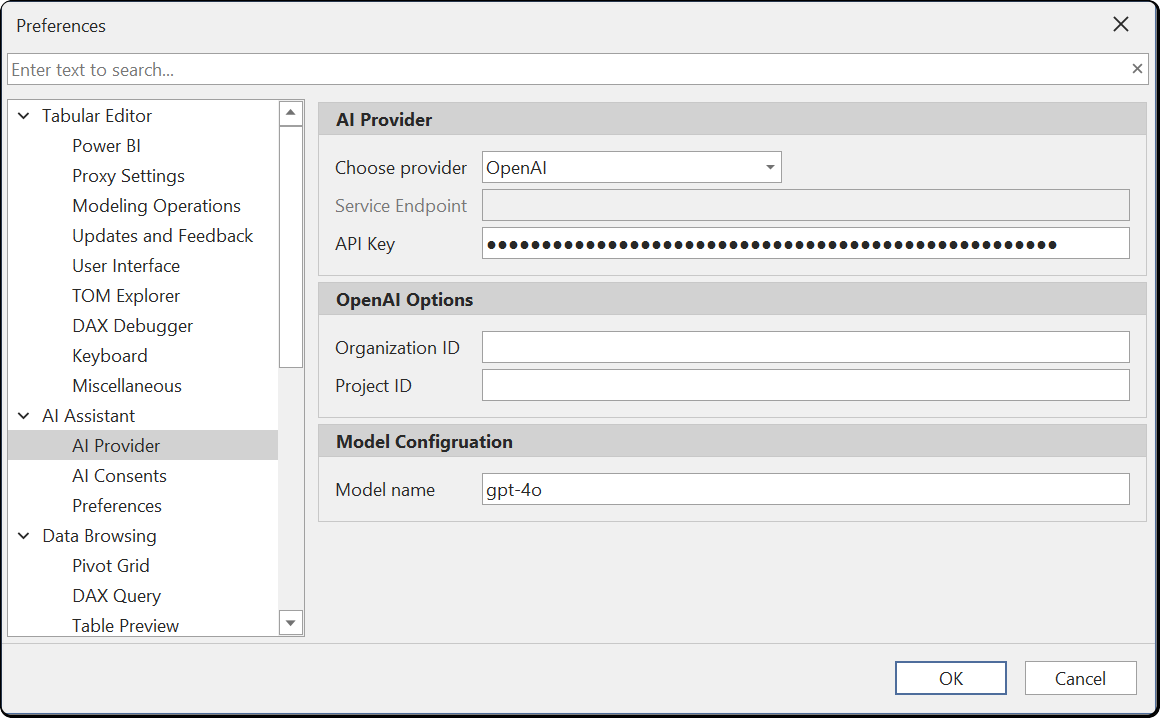
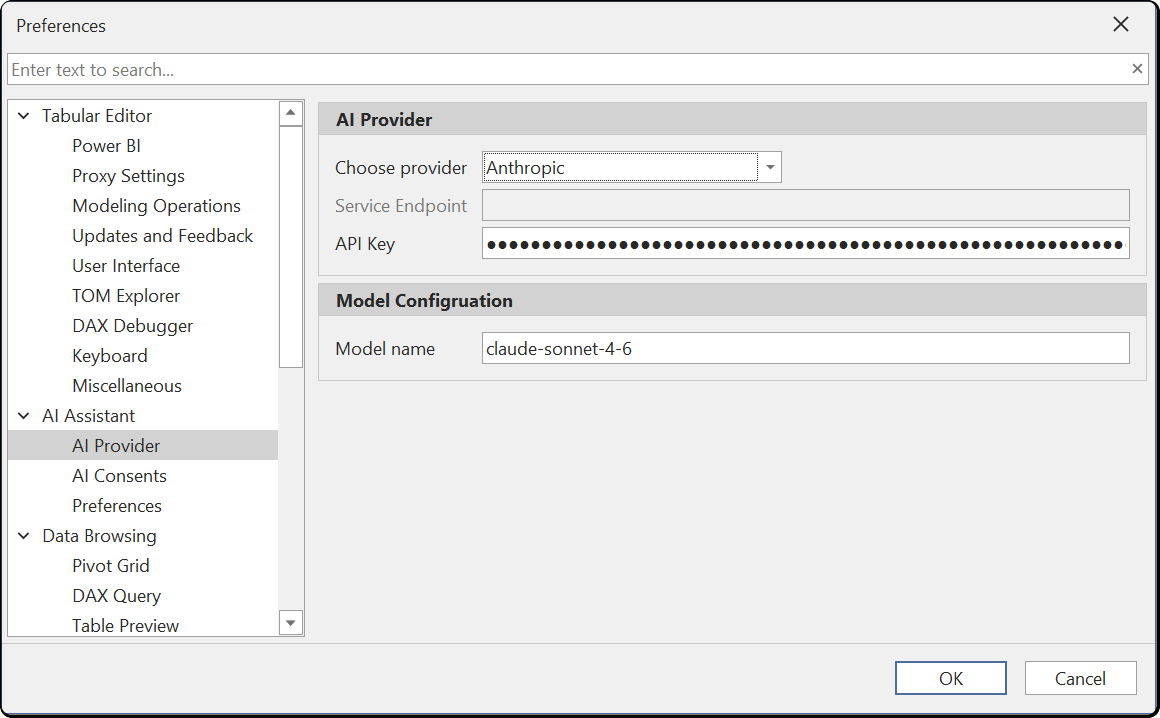
Configure your AI provider under Tools > Preferences > AI Assistant > AI Provider. Select a provider from the dropdown — the default is None (AI disabled) until you configure one — enter your API key, and optionally override the default model. For OpenAI and Anthropic, the Model name field is a combo box pre-populated with current models — including Anthropic's claude-fable-5 and claude-opus-4-8 and OpenAI's gpt-5.5 and gpt-5.5-pro — so you can pick a recent model without typing a custom ID. You can also type a custom model name.
| Provider | Default Model | Configuration Required |
|---|---|---|
| OpenAI | gpt-5.5 | API key. Optional base URL, Organization ID and Project ID |
| Anthropic | claude-sonnet-4-6 | API key. Optional base URL |
| Azure OpenAI | Deployment-dependent | API key, endpoint URL and deployment name |
| Custom (OpenAI-compatible) | User-specified | API key and custom endpoint URL |
OpenAI
Select OpenAI as the provider and enter your API key. You can optionally specify an Organization ID and Project ID if your OpenAI account uses these. The default model is gpt-5.5, but you can change it to any model available on your account.
Anthropic
Select Anthropic as the provider and enter your API key. The default model is claude-sonnet-4-6. You can change the model name to any Anthropic model available on your account.
Important
Anthropic enforces input token per minute (ITPM) rate limits based on your account tier. A new API key starts at Tier 1 with 30,000 ITPM for Claude Sonnet 4.x. A single request against a large model can exceed this limit. Purchase $40 or more in API credits to reach Tier 2 (450,000 ITPM). See the Anthropic rate limits documentation for full tier details.
Azure OpenAI
Select Azure OpenAI as the provider and configure three fields:
- API key — the access key for your Azure OpenAI resource
- Service endpoint — the endpoint URL for your resource, for example
https://your-resource.openai.azure.com. Use the resource URL, not theprivatelinkalias; the SSL certificate is issued for*.openai.azure.comand connecting directly to*.privatelink.openai.azure.comfails certificate validation - Model name — the deployment name, not the underlying model name and not the resource name
Azure OpenAI requires the deployment name in every API call. A deployment name is chosen when the deployment is created, so it can be any string. Deployments are often named after the model they serve (for example gpt-4o), but that is a convention, not a requirement. If you enter the resource name or a raw model name that does not exist as a deployment, the request fails.
Finding your deployment name
In the Azure AI Foundry portal:
- Sign in and select your Azure OpenAI resource
- Open Deployments (or Models + endpoints if the resource has been upgraded to Foundry)
- Copy the value from the Name column
Deployments created before your organization adopted Azure AI Foundry may not appear in the portal. List them from the Azure CLI:
az cognitiveservices account deployment list --name "<resource-name>" --resource-group "<resource-group>" --output table
See Create and deploy an Azure OpenAI resource for more details.
For 403 errors, SSL failures or "DeploymentNotFound" responses, see Azure OpenAI connection errors.
Note
The Azure OpenAI provider is for classic Azure OpenAI resources that use the api-version query parameter. If you are using the new Microsoft Foundry, see Using Microsoft Foundry below.
Custom (OpenAI-compatible)
The Custom provider option supports local or organizational LLMs that expose an OpenAI-compatible API endpoint. Enter your API key and the custom endpoint URL. This allows you to keep all data within your own infrastructure for data privacy or compliance requirements.
Using a local or organizational LLM
You can run the AI Assistant against a self-hosted LLM by using the Custom provider. This keeps all data within your own infrastructure — whether that is a model running on your local machine or a centrally hosted LLM within your organization's network. Either way, no data is sent to a third-party cloud provider.
Several tools can host models with an OpenAI-compatible API:
- Ollama — lightweight CLI for downloading and running models locally
- LM Studio — desktop application with a graphical interface for managing and running local models
- LocalAI — self-hosted, community-driven alternative with broad model support
These tools can run on a developer's workstation for individual use, or be deployed on a shared server within your organization to provide a centrally managed LLM endpoint for your team.
Example: Ollama
- Download and install Ollama
- Pull a model, for example:
ollama pull llama3.1 - Start the Ollama server (it runs automatically after installation, by default on port 11434)
- In Tabular Editor, go to Tools > Preferences > AI Assistant > AI Provider
- Set Choose provider to Custom (OpenAI-compatible)
- Set Service Endpoint to
http://localhost:11434/v1 - Set Model name to the model you pulled (e.g.
llama3.1) - The API Key field can be set to any non-empty value (e.g.
ollama) — Ollama does not require authentication, but the field cannot be left blank
Example: LM Studio
- Download and LM Studio
- Pull a model. Either through the model search page on the left panel or the CLI. For example:
lms get lmstudio-community/Meta-Llama-3.1-8B-Instruct-GGUF - Start the LM Studio server. Either through the developer page on the left panel or through the CLI. for example
lms server startNote, you will have to configure it to use OpenAI compatible mode. Additionally, you may have to change the default context size to be over 100,000 tokens. - In Tabular Editor, go to Tools > Preferences > AI Assistant > AI Provider
- Set Choose provider to Custom (OpenAI-compatible)
- Set Service Endpoint to
http://localhost:1234/v1 - Set Model name to the model you pulled (e.g.
lmstudio-community/Meta-Llama-3.1-8B-Instruct-GGUF) - The API Key field can be set to any non-empty value (e.g.
lms) — LM Studio does not require authentication, but the field cannot be left blank
Note
Response quality with local models depends on the model size and your hardware. Larger models generally produce better results but require more RAM and a capable GPU. The AI Assistant's tool-calling capabilities require a model that supports function calling in the OpenAI-compatible format.
Tip
We recommend a model with a minimum of 30 billion parameters but ideally at least 100 billion parameters. For example, the Qwen3.5-122B-A10B model performed well in our internal testing.
Using Microsoft Foundry
Microsoft Foundry (formerly Azure AI Foundry) lets you deploy OpenAI and Anthropic models in your Azure environment. These models are accessed through the OpenAI or Anthropic provider in Tabular Editor — not the Azure OpenAI provider, which is for classic Azure OpenAI resources.
Important
Do not use the Azure OpenAI provider for Microsoft Foundry models. The Azure OpenAI provider is only compatible with classic Azure OpenAI resources.
OpenAI models on Microsoft Foundry
To use an OpenAI model (such as GPT-4o or GPT-5.4-mini) deployed in Microsoft Foundry:
- In Tabular Editor, go to Tools > Preferences > AI Assistant > AI Provider
- Set Choose provider to OpenAI
- Set Base URL to your Foundry resource endpoint with
/openai/v1appended. The URL follows one of these formats:https://your-resource.services.ai.azure.com/openai/v1https://your-resource.openai.azure.com/openai/v1
- Enter your Foundry API Key
- Set Model name to your deployment name (e.g.
gpt-5.4-mini)
Note
The base URL is not shown directly in the Microsoft Foundry portal. The portal shows a Target URI that includes the full API path (e.g. https://your-resource.services.ai.azure.com/api/projects/YourProject/openai/v1/responses). For the base URL, use just https://your-resource.services.ai.azure.com/openai/v1.
Anthropic models on Microsoft Foundry
To use an Anthropic model (such as Claude Sonnet 4.6) deployed in Microsoft Foundry:
- In Tabular Editor, go to Tools > Preferences > AI Assistant > AI Provider
- Set Choose provider to Anthropic
- Set Base URL to your Foundry resource endpoint with
/anthropicappended, e.g.https://your-resource.services.ai.azure.com/anthropic - Enter your Foundry API Key
- Set Model name to the model identifier (e.g.
claude-sonnet-4-6)
Note
The portal shows a Target URI like https://your-resource.services.ai.azure.com/anthropic/v1/messages. For the base URL, use the part up to and including /anthropic only.
Capabilities
The AI Assistant has access to your model context and can perform the following actions:
- Model exploration: Query model metadata including tables, columns, measures, relationships and their properties
- DAX query writing: Generate DAX queries and execute them against your connected model, returning result sets directly in the chat
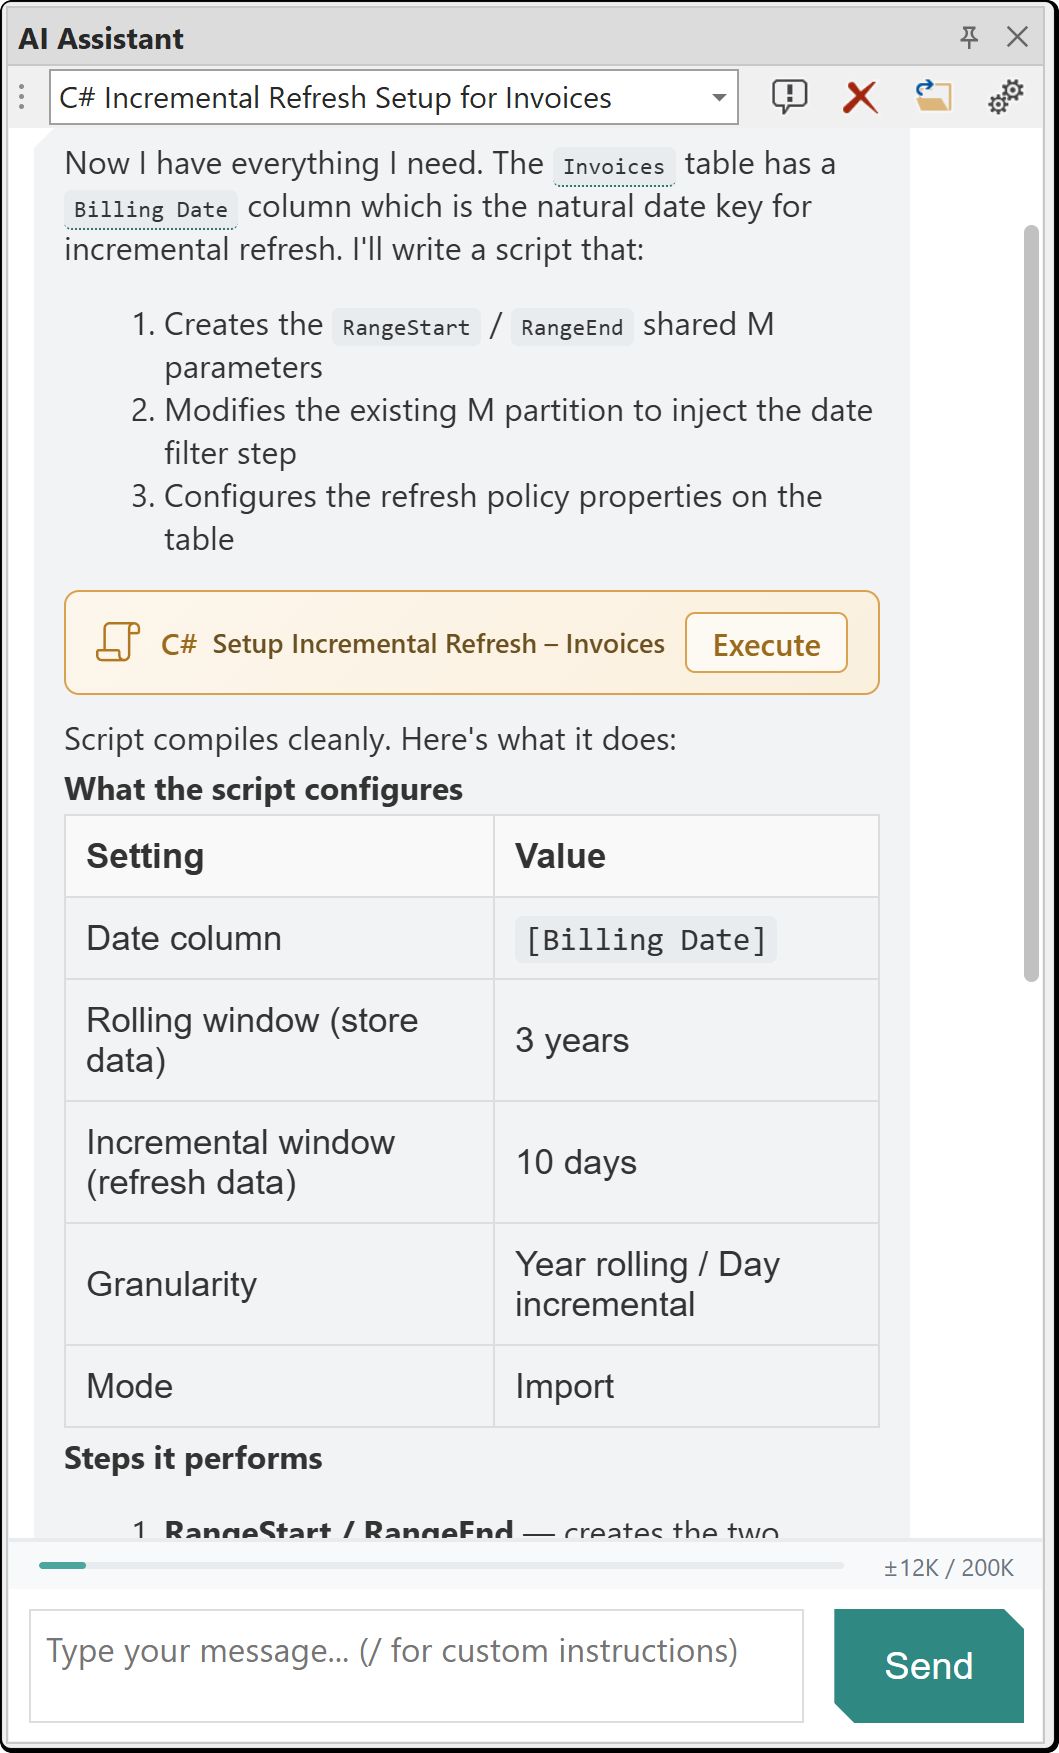
- C# script generation: Create C# scripts for model modifications that open in a new editor window. When you click Execute in the chat, the preview changes dialog is shown by default, letting you review all model metadata changes before accepting them. You can also open the script in the editor and run it from the script toolbar, with or without the preview. Model metadata changes can be undone with Ctrl+Z
- Best Practice Analyzer: Run BPA analysis, view rule violations and create or modify BPA rules
- VertiPaq Analyzer: Query memory usage statistics and column cardinality
- Document access: Read and modify open documents such as DAX scripts and DAX queries
- Knowledge base search: Search the embedded Tabular Editor documentation for answers
- UI navigation: Generate
te3://action links that open specific Tabular Editor dialogs and features
Note
Tools that require an active database connection — including DAX query execution and VertiPaq Analyzer statistics — are automatically hidden when working with a model file (for example a .bim or .tmdl folder) that is not connected to Analysis Services or Power BI. The assistant will still write DAX queries for you, but the Execute button on DAX query artifacts is disabled until a connection is established. VertiPaq Analyzer statistics remain available if they were previously loaded from a .vpax file.
Conversations
The AI Assistant supports multiple simultaneous conversations. Each conversation maintains its own message history and context.
- Conversations persist across sessions, stored locally in
%LocalAppData%\TabularEditor3\AI\Conversations\ - Titles are generated automatically after the first exchange. You can rename conversations manually
- Auto-compaction: When the conversation approaches the context window limit (~80%), older messages are automatically summarized to free up space. A snapshot of the full conversation is archived before compaction
Artifacts
When the AI Assistant generates code, it creates artifacts that open directly in editor windows:
- C# Scripts: Open in a new C# script editor with syntax highlighting, compilation and execution support
- DAX Queries: Open in a new DAX query editor with syntax highlighting and execution support
Artifacts stream in real-time as the AI generates them. C# script artifacts include safety analysis that flags potentially unsafe code (e.g. file system access or network operations).
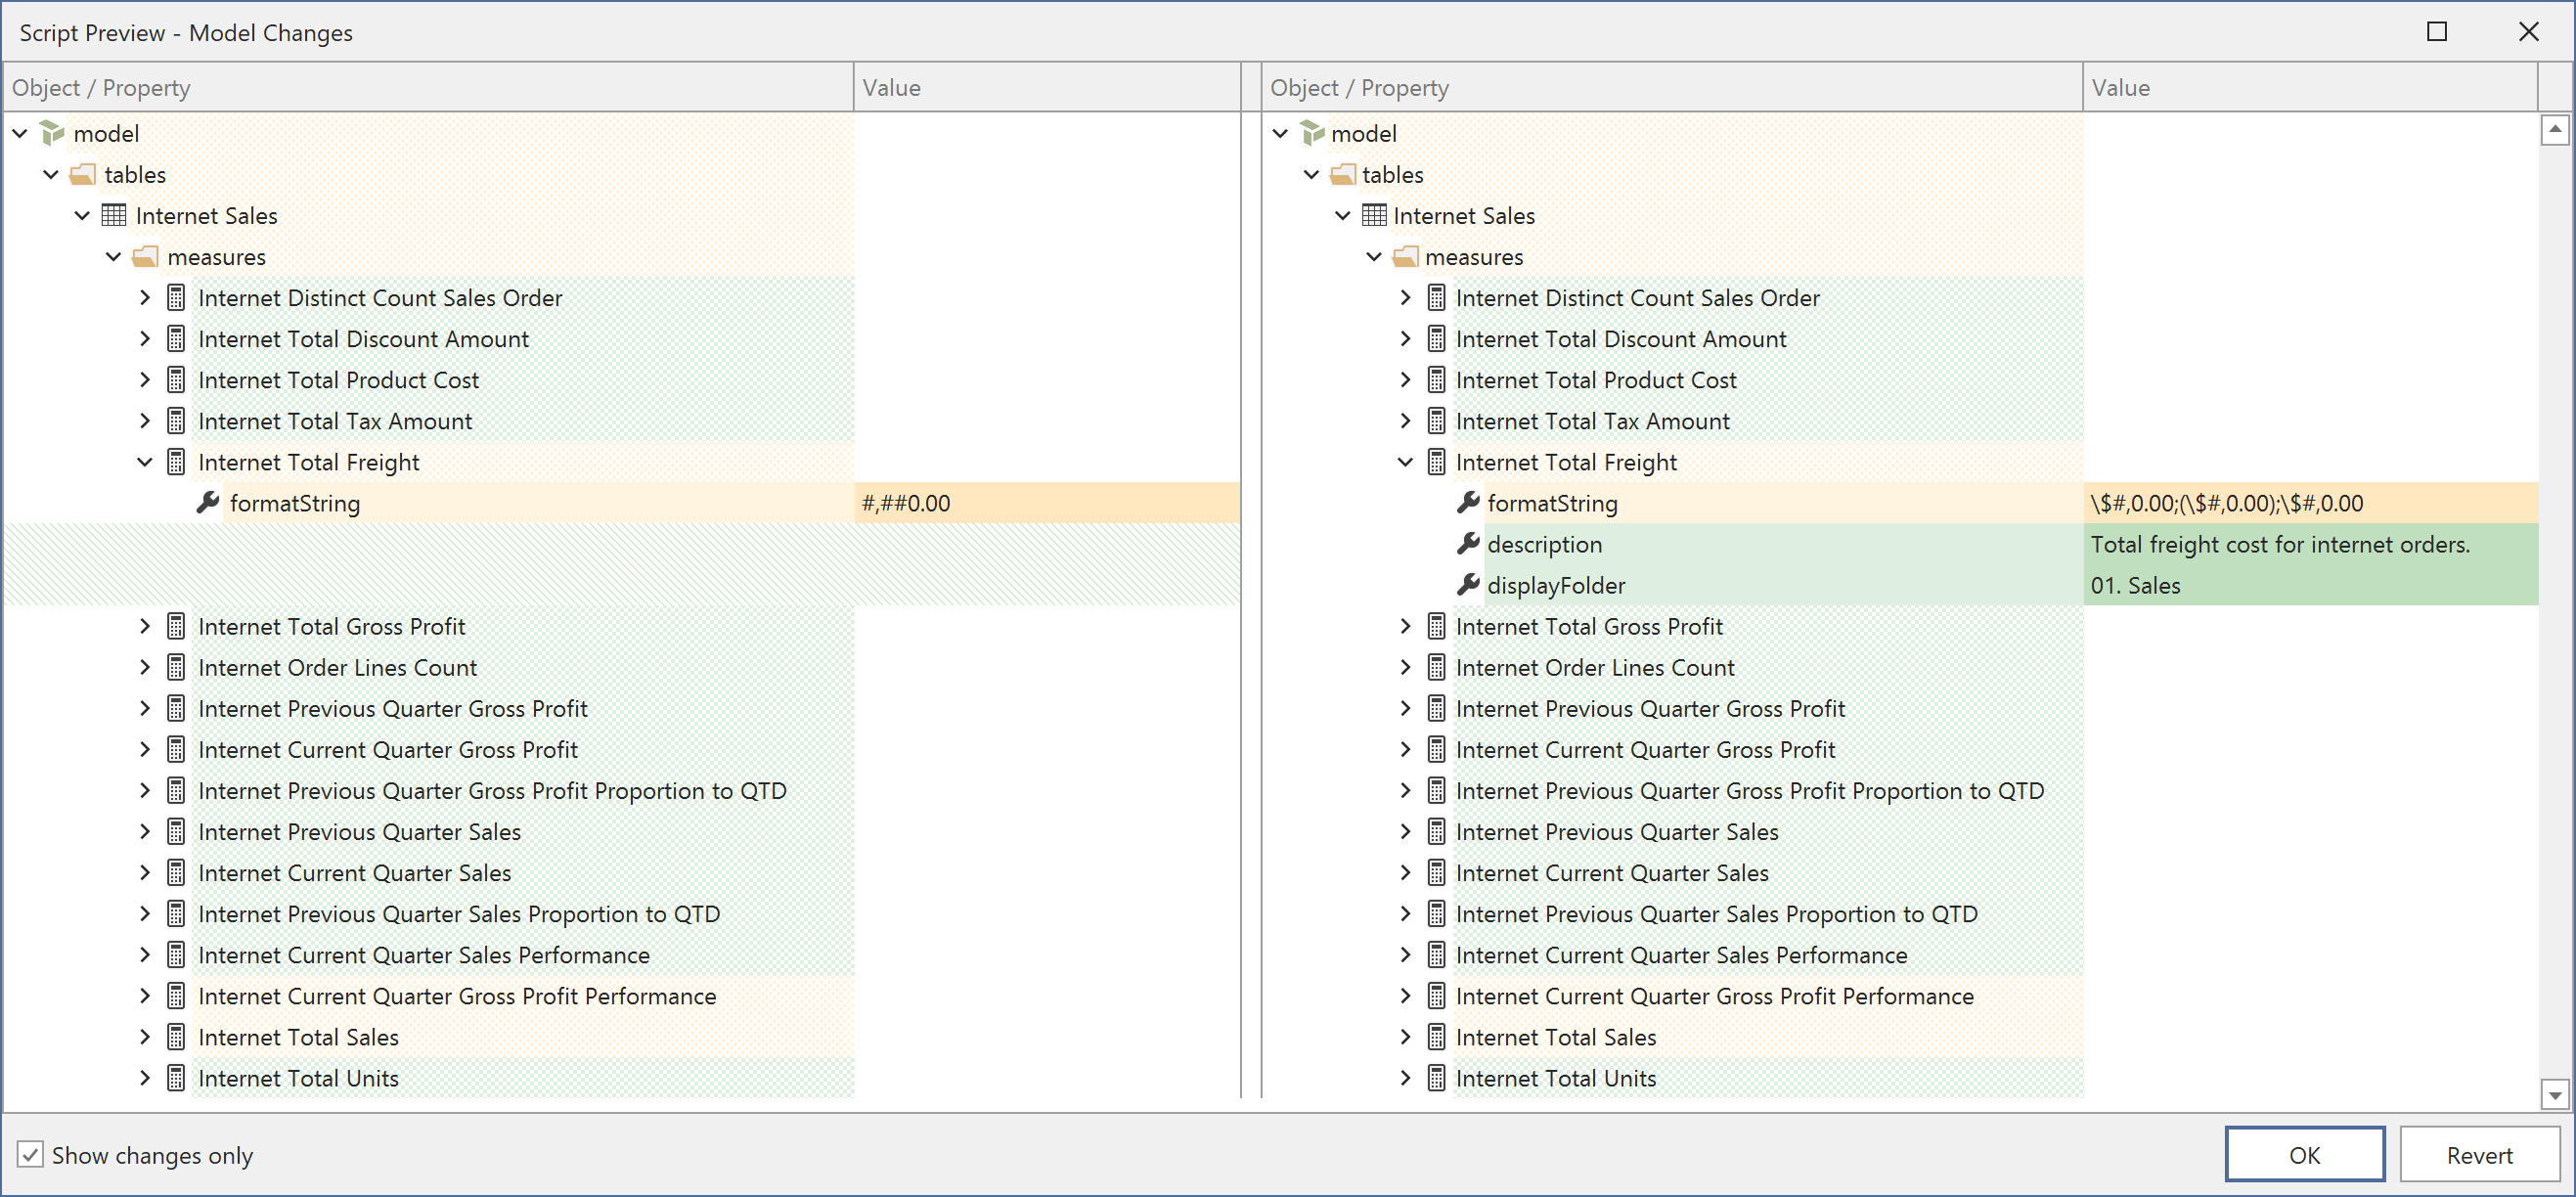
When you execute a C# script from the chat, the Script Preview dialog shows a side-by-side diff of all model metadata changes made by the script. You can accept the changes or revert them. See Running scripts with preview for details.
Custom Instructions
Custom Instructions are instruction sets that guide the AI Assistant's behavior for specific tasks. They are activated automatically based on intent detection or invoked explicitly.
Built-in Custom Instructions
The AI Assistant includes the following built-in Custom Instructions:
| Custom Instruction | Triggers On |
|---|---|
| DAX Querying | DAX, query, evaluate, measure |
| Model Modification | Modify, change, add, update, create |
| Model Design | Design, architecture, pattern, best practice |
| Organize Model | Organize, clean up, folder, rename |
| Optimize Model | Optimize, performance, slow, speed |
| Macros | Macro, automate, record |
| UDFs | UDF, function, user-defined |
| BPA | BPA, best practice, rule, violation |
Custom Instructions are shown as indicators above assistant responses, indicating which instructions influenced the response. You can toggle this display in Preferences > AI Assistant > Preferences > Show custom instructions indicator.
Invoking a Custom Instruction
Type / to browse available custom instructions, or type the full /instruction-id at the start of your message to explicitly invoke a specific instruction. For example, /dax-querying forces the DAX querying instruction regardless of message content.
Add your own Custom Instructions
You can create custom instructions by placing .md files in %LocalAppData%\TabularEditor3\AI\CustomInstructions\. Each file requires YAML frontmatter defining the instruction metadata:
---
id: my-custom-skill
name: My Custom Skill
description: A brief description shown in the autocomplete popup.
priority: 100
always_inject: false
hidden: false
triggers:
  keywords:
    - keyword1
    - keyword2
  patterns:
    - "\\bregex pattern\\b"
  context_required:
    - model_loaded
---

Your instruction content goes here. This is the text that will be
injected into the AI's system prompt when the instruction is activated.
| Field | Required | Default | Description |
|---|---|---|---|
id |
No | Filename without .md |
Unique identifier, also used as /id for explicit invocation |
name |
No | Title-cased id |
Display name in autocomplete |
description |
No | - | Short description shown below the name |
priority |
No | 100 | Higher values are injected first when multiple Custom Instructions match |
always_inject |
No | false | If true, always included in the system prompt |
hidden |
No | false | If true, not shown in /command autocomplete |
triggers.keywords |
No | [] | Words that activate the instruction (case-insensitive) |
triggers.patterns |
No | [] | Regex patterns for complex matching |
triggers.context_required |
No | [] | Conditions that must be met (e.g. model_loaded) |
Custom Instructions with an id matching a built-in instruction will override the built-in version.
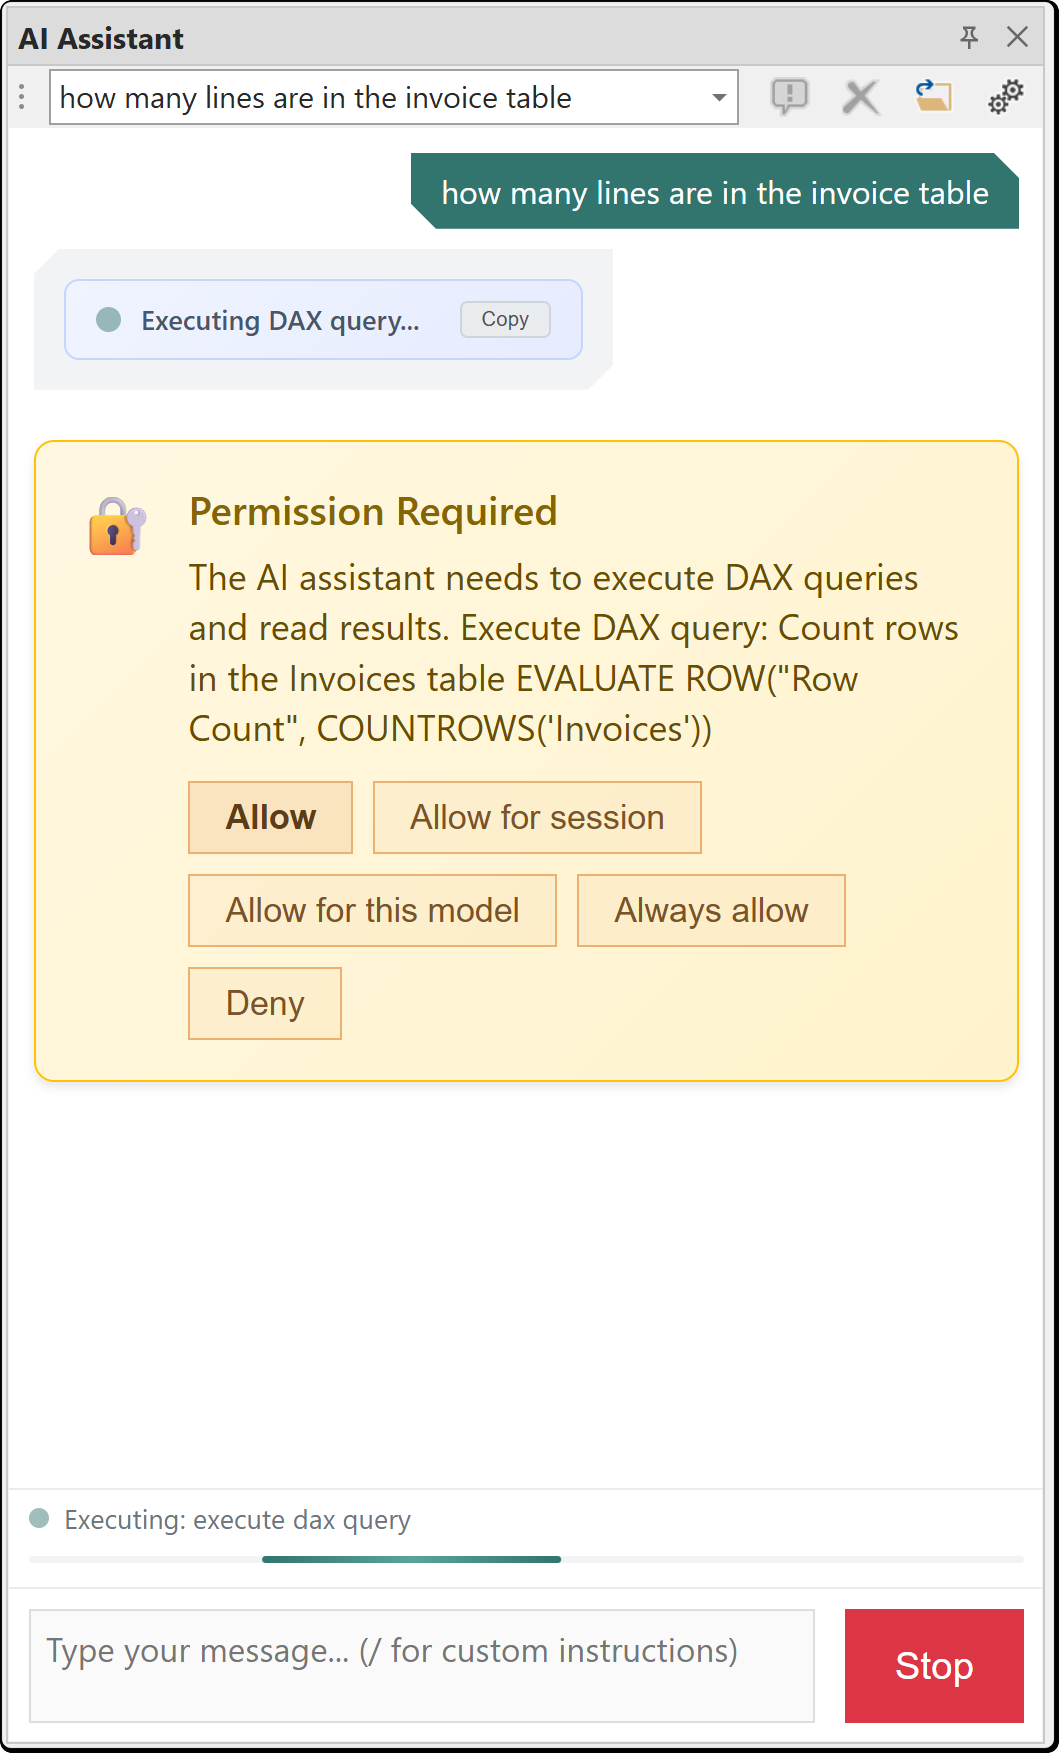
Consent
The AI Assistant requests permission before sending data to the AI provider. Consent is scoped to specific data types:
| Consent Category | Description |
|---|---|
| Query data | DAX query results and data samples |
| Read documents | Reading content from open documents such as DAX scripts and DAX queries |
| Modify documents | Making changes to open documents |
| Model metadata | Table and column schemas, measure definitions and other model metadata |
| Edit BPA rules | Creating or modifying Best Practice Analyzer rules |
| Read macros | Reading macro definitions |
When the AI Assistant needs access to a data type for the first time, a consent dialog appears. You can choose the duration of your consent:
| Option | Scope |
|---|---|
| This time | Single request only |
| This session | Until Tabular Editor is restarted |
| For this model | Persisted in the model's user options (.tmuo) file |
| Always | Global preference, persisted across all models and sessions |
Managing Consents
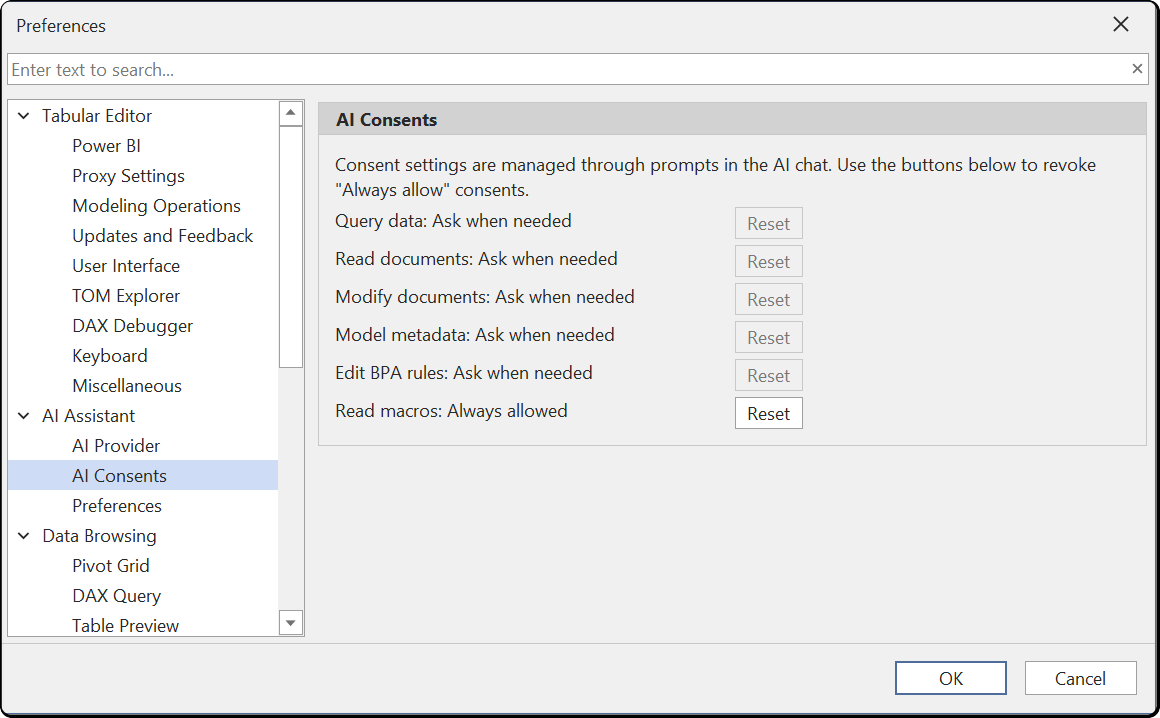
You can review and reset your consent choices under Tools > Preferences > AI Assistant > AI Consents. Each consent category shows its current state. Click Reset to revoke an "Always allowed" consent and return it to "Ask when needed".
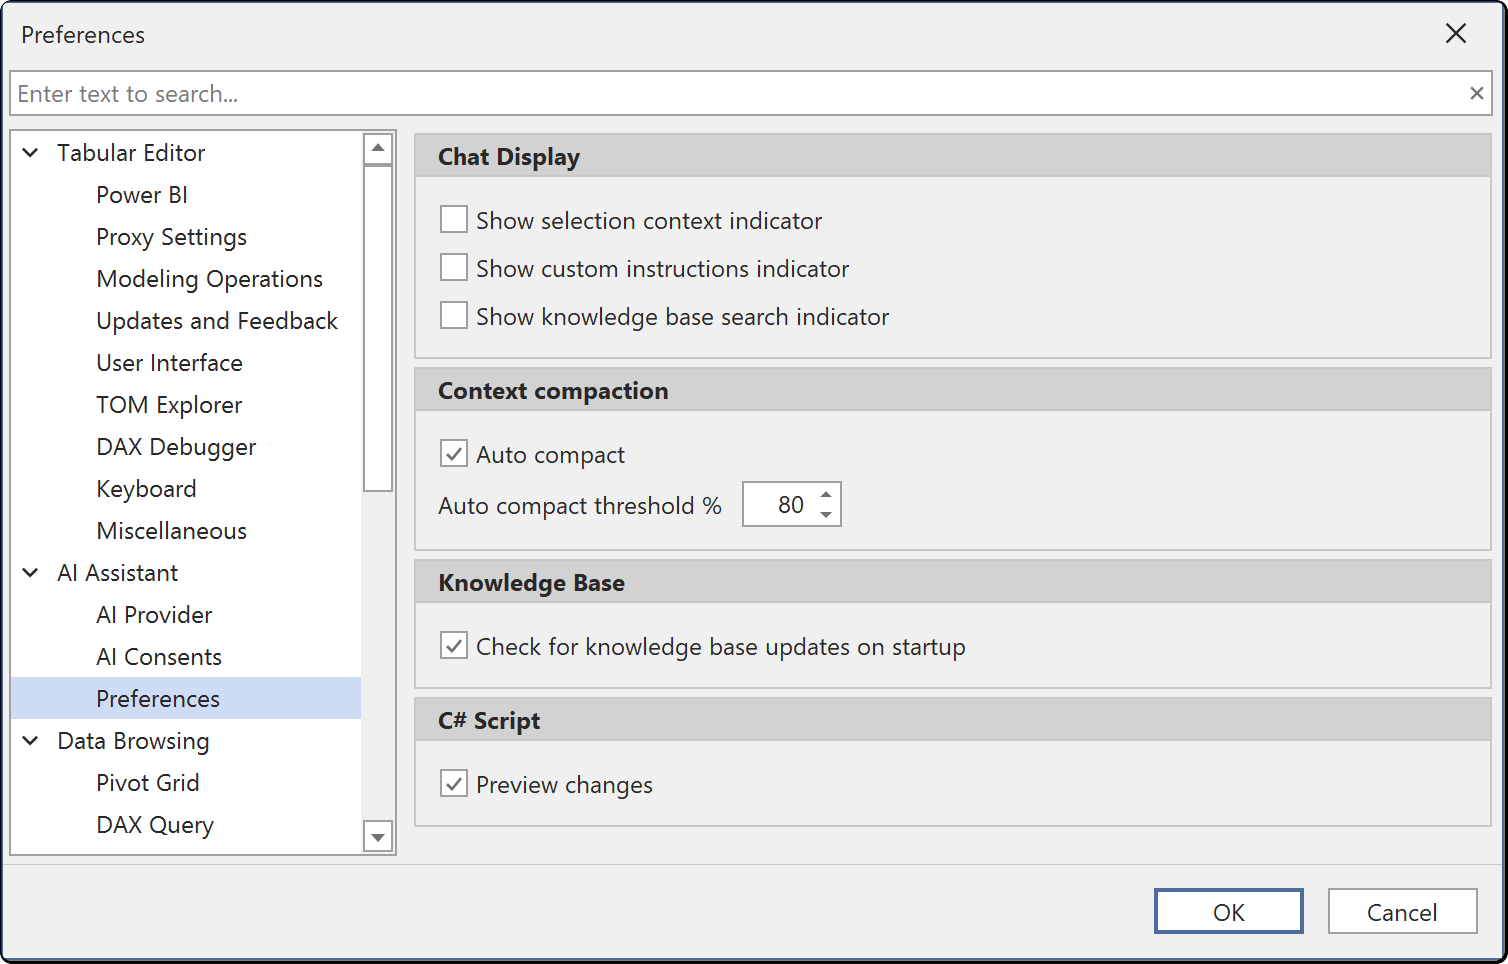
Preferences
Configure AI Assistant display and behavior options under Tools > Preferences > AI Assistant > Preferences.
Chat Display
| Preference | Default | Description |
|---|---|---|
| Show selection context indicator | true | Display the currently selected model object in the chat |
| Show custom instructions indicator | true | Show Custom Instruction indicators above assistant responses |
| Show knowledge base search indicator | true | Display progress when searching the knowledge base |
Context Compaction
| Preference | Default | Description |
|---|---|---|
| Auto compact | true | Automatically summarize old messages when approaching the context limit |
| Auto compact threshold % | 80 | Token usage percentage that triggers auto-compaction |
Knowledge Base
| Preference | Default | Description |
|---|---|---|
| Check for knowledge base updates on startup | true | Automatically check for knowledge base updates when Tabular Editor starts |
C# Script
| Preference | Default | Description |
|---|---|---|
| Preview changes | true | Show the preview changes dialog when executing AI-generated C# scripts from the chat |
Token Usage
Each message to the AI Assistant consumes input tokens. The token cost of a single message depends on what context is included:
- System prompt and custom instructions: Sent with every message. Typically 5,000 to 15,000 tokens depending on which custom instructions are active.
- Model metadata: When the assistant needs to understand your model, it retrieves metadata through tool calls. To stay within provider rate limits on large models, the assistant uses a progressive-disclosure approach — it first fetches a lightweight overview (table and measure names, relationships), then searches for relevant objects by name, description or DAX expression, and only drills into full details for the specific tables or objects that the question requires. Tool results that would otherwise be very large are truncated with guidance on how the assistant can retrieve the remaining data.
Token Counter
The token counter in the bottom-right of the chat input area shows cumulative token usage for the current conversation, including input from tool round-trips. Hover over the counter to see a breakdown:
- Input — full-price input tokens for the conversation, with a sub-line showing how many of those were served from the provider's prompt cache
- Cache write — tokens written to the prompt cache (provider-dependent)
- Output — tokens generated by the model
- Context pressure — percentage of the context window currently in use; also visualized by the slider bar next to the counter
Reducing Token Usage
Select specific objects in the TOM Explorer before asking your question. When objects are selected, the assistant scopes its context to those objects instead of retrieving metadata for the entire model. This is the most effective way to reduce both token usage and API cost.
Other ways to reduce token usage:
- Ask focused questions about specific tables, measures or columns rather than broad questions about the entire model. A vague prompt such as "Set display folders on all measures" forces the assistant to retrieve metadata for the entire model. A specific prompt such as "Set display folders on the measures I have selected" limits the context to the current selection and uses far fewer tokens
- Start new conversations when switching topics to avoid accumulating long conversation histories
- Use a smaller or less expensive model for exploratory questions
Limitations
- Requires a user-provided API key. No built-in API key is included
- AI responses depend on the selected model and provider capabilities
- Maximum context window is 200,000 tokens
- The AI Assistant is not a replacement for understanding DAX and semantic model design fundamentals
- Response quality varies by provider and model selection
- The AI Assistant cannot connect to external files, services or search the web
- The AI Assistant cannot add or act as an MCP server
- The AI Assistant cannot connect to a different model from within the chat. Use the Tabular Editor user interface to change model connections
- The AI Assistant cannot manage preferences
Disabling the AI Assistant
The AI Assistant is an optional component. While the feature is in public preview, it will be excluded by default during installation, but users have the option to include it. You can modify an existing Tabular Editor 3 installation, to include or exclude the AI Assistant component, by running the Tabular Editor 3 installer again. If using the portable build of Tabular Editor 3, you can remove the AI Assistant component by deleting the file named TabularEditor3.AI.dll from the installation directory.
Note
Regardless of whether the AI Assistant component is installed or not, a system admin can disable all AI functionality in Tabular Editor 3 by specifying the DisableAi policy.