Advanced installation and activation
Overview
This page covers advanced installation and activation scenarios for Tabular Editor 3: manual (offline) activation, registry-based license management, silent deployment, and Enterprise seat administration.
For the standard activation flow, see Installation and Activation.
Manual activation (no internet)
If you do not have access to the internet, for example due to a proxy, Tabular Editor prompts you to do a manual activation.
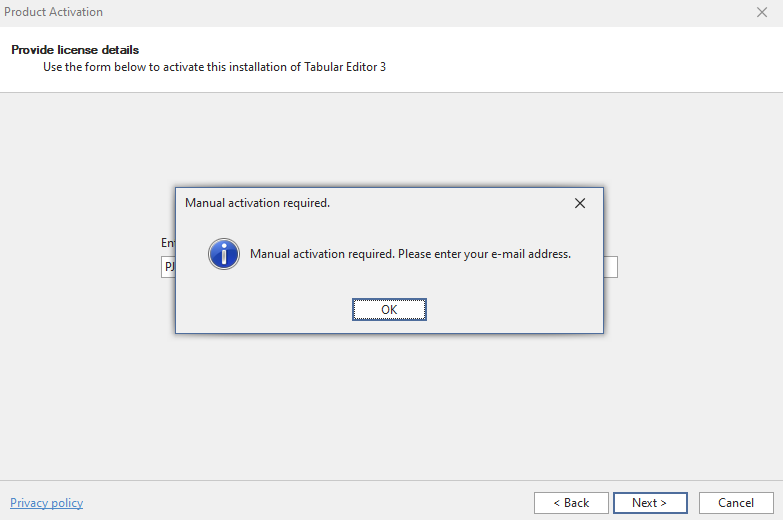
After entering your e-mail, a dialog appears with a link to an activation key. Copy the URL and open it in a web browser that is connected to the internet.
The URL returns a JSON object:

Copy the full JSON object and paste it into the dialog. Your manual activation dialog ends up looking like the screenshot below.
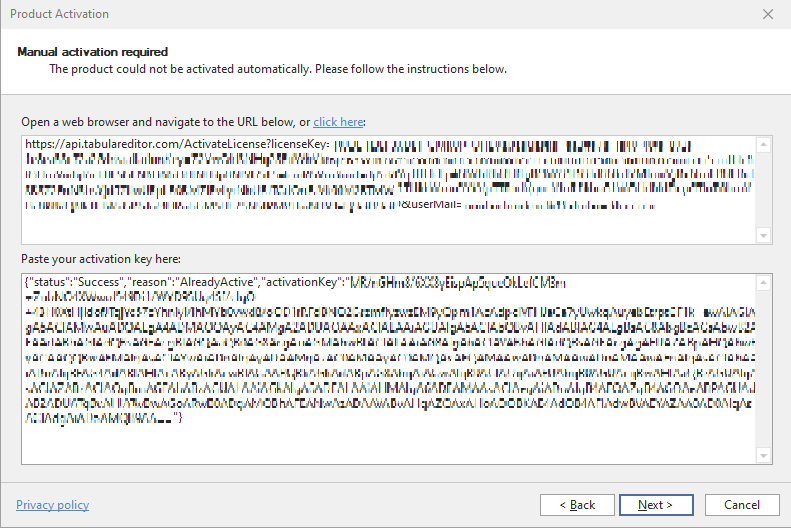
Your Tabular Editor 3 license is then verified.
Changing seats on Enterprise Edition
To change an Enterprise seat, deregister the existing user from the seat through the Tabular Editor Self-Service portal. The subscription owner or license administrator creates an account, or logs in with an existing one, to administer the license seats.
Note
Changing a user is only possible on the Enterprise Edition.
Registry details
Tabular Editor 3 stores activation details for each Windows user under HKEY_CURRENT_USER\SOFTWARE\Kapacity\Tabular Editor 3.
| Value | Type | Content |
|---|---|---|
LicenseKey |
REG_SZ |
The license key |
User |
REG_SZ |
The e-mail address of the licensed user, for multi-user licenses |
ActivationKey |
REG_SZ |
The activation returned by the licensing service |
Activation |
REG_SZ |
An activation written by older versions of Tabular Editor 3. Tabular Editor 3 deletes it the next time it stores an activation |
InstallationDate |
REG_QWORD |
The first launch of Tabular Editor 3 for this Windows user. Tabular Editor 3 creates it on launch if it's missing |
To view the current license key for the active Windows user, run the following command in the Windows Command Prompt (Start > Run > cmd.exe):
REG QUERY "HKCU\Software\Kapacity\Tabular Editor 3" /v LicenseKey
You can also use regedit.exe (Windows Registry Editor) and navigate to HKEY_CURRENT_USER\SOFTWARE\Kapacity\Tabular Editor 3 to view and modify the values.
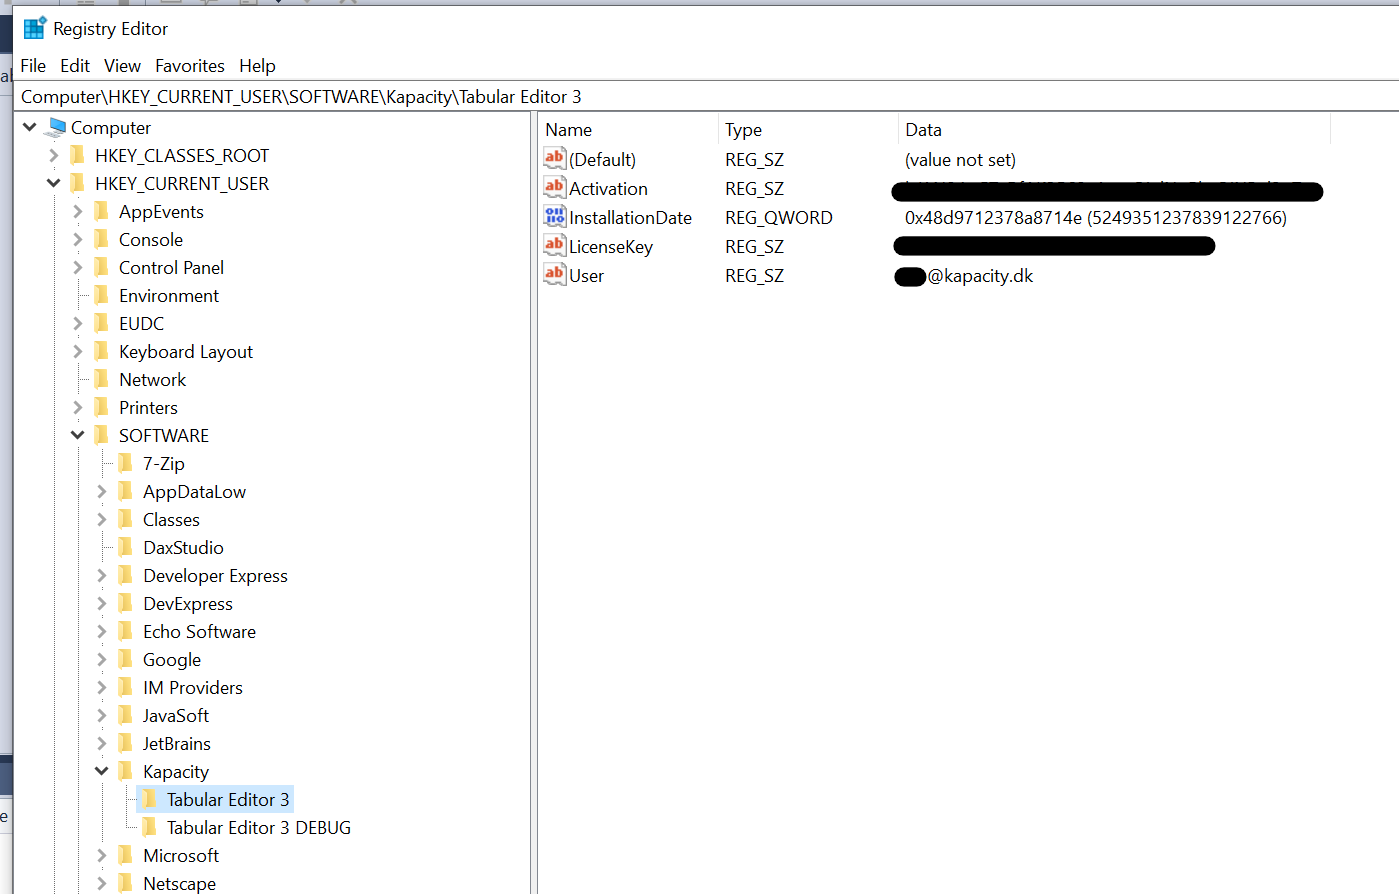
A system administrator can also proactively assign Tabular Editor 3 licenses to a machine by specifying the LicenseKey and User values under each user's SOFTWARE\Kapacity\Tabular Editor 3 registry key. See Silent installation and license pre-provisioning for the full deployment procedure.
Changing a license key through the registry
The Change license key option in Help > About Tabular Editor removes the LicenseKey, User, ActivationKey and Activation values and deactivates the installation on the licensing service. The option appears only when no model is loaded and the license is activated or its seat reservation has expired. If it isn't shown, for example because activation failed, reset the license through the Registry Editor:
- Close all instances of Tabular Editor 3.
- Open the Registry Editor in Windows (Start > Run > regedit.exe).
- Locate
HKEY_CURRENT_USER\SOFTWARE\Kapacity\Tabular Editor 3(see screenshot above). - Delete the
LicenseKey,User,ActivationKeyandActivationvalues. LeaveInstallationDatein place. - Close the Registry Editor and restart Tabular Editor 3.
Alternatively, run the following commands in a Windows Command Prompt (Start > Run > cmd.exe). A command reports an error if its value doesn't exist, and the remaining commands still run:
REG DELETE "HKCU\Software\Kapacity\Tabular Editor 3" /v LicenseKey /f
REG DELETE "HKCU\Software\Kapacity\Tabular Editor 3" /v User /f
REG DELETE "HKCU\Software\Kapacity\Tabular Editor 3" /v ActivationKey /f
REG DELETE "HKCU\Software\Kapacity\Tabular Editor 3" /v Activation /f
The next time you launch Tabular Editor 3, you're prompted for a license key.
Note
Deleting the registry values doesn't deactivate the installation, use the Tabular Editor Self-service portal to manage your activated licenses.
Silent installation and license pre-provisioning
You can deploy Tabular Editor silently and pre-provision the license through the Windows Registry. Install first, then write the license, which has to be in place before the application is launched for the first time.
Install silently
No UI, no reboot:
msiexec /i TabularEditor.<version>.x64.Net10.msi /qn /norestart /l*v C:\Temp\TE3_install.log
| MSI Feature | Shown in the installer as | Description | Installed by default |
|---|---|---|---|
MainFeature |
Tabular Editor 3 | Core Tabular Editor 3 application | Yes (Required) |
AIAssistant |
AI features | The AI Assistant and the MCP server | Yes, from 3.27.0 |
Important
The command above installs the AI features component. Up to 3.26.x it had to be selected deliberately and a default installation left it out; from 3.27.0 it is part of a default installation. If your organization does not want the AI Assistant or the MCP server on user machines, you have to say so explicitly, as described in the next section.
Deploying without the AI features
To keep the AI files off the machine, name the features you want and leave AIAssistant out:
msiexec /i TabularEditor.<version>.x64.Net10.msi /qn /norestart ADDLOCAL=MainFeature /l*v C:\Temp\TE3_install.log
To take the component off machines that already have it, run the same package with REMOVE:
msiexec /i TabularEditor.<version>.x64.Net10.msi /qn /norestart REMOVE=AIAssistant /l*v C:\Temp\TE3_install.log
Either way, the AI assemblies are never written to the installation folder, the AI Assistant pane and the MCP server are absent from the application, and nothing reaches out to a model provider. Everything else in Tabular Editor 3 is unaffected.
Upgrading an existing installation keeps the feature selection that machine already has, so a machine that was deployed without the AI features before 3.27.0 does not gain them by being upgraded. Pass ADDLOCAL=MainFeature on fresh installations, where there is no earlier selection to inherit.
Important
The command line controls what you deploy, not what a user can install: the AI features are the default, so anyone who runs the installer themselves gets them. To make the decision stick, set the DisableAi Policies as well. From 3.27.0 the installer reads that policy and leaves the AI component out on its own, whoever runs it and however it is run, and the policy also turns the AI Assistant and the MCP server off at runtime if the component is already present. Set it machine-wide, under HKEY_LOCAL_MACHINE\Software\Policies\Tabular Editor ApS\TE3, so it applies to every user and cannot be overridden per user.
Note
When using ADDLOCAL, list MainFeature alongside any optional features. Specifying only AIAssistant without MainFeature results in an incomplete installation.
Package names and other MSI options
You can also use /package instead of /i. Replace <version> with the actual version string.
MSI packages are named TabularEditor.<version>.<architecture>.<runtime>.msi, for example TabularEditor.3.27.0.x64.Net10.msi or TabularEditor.3.27.0.ARM64.Net8.msi. Pick the architecture and runtime that suit the target machines; see System requirements. The MSI does not install the .NET Desktop Runtime, so deploy that first.
For details on available MSI command-line options, see the official Microsoft documentation: Microsoft Standard Installer command-line options - Win32 apps | Microsoft Learn
Pre-provision the license
Write the license to the Registry before the first launch of the application:
REM Per-user license key (HKCU)
REG ADD "HKCU\Software\Kapacity\Tabular Editor 3" /v LicenseKey /t REG_SZ /d YOUR-25-CHAR-KEY /f
If you are using an Enterprise Edition license key, also set the licensed user's e-mail:
REG ADD "HKCU\Software\Kapacity\Tabular Editor 3" /v User /t REG_SZ /d user@example.com /f
Notes
- The installer does not accept a license parameter; licensing is handled via the Registry entries above.
- Keys are stored under HKCU (per-user). Ensure the commands run in the context of the target user (for example via a logon script) so the values are written to the correct profile.
- For additional keys and values, see Registry details.